Designing the Perfect Wedding Layout: A Step‑by‑Step Guide
 Oct, 13 2025
Wedding Layout Calculator
Venue & Guest Input
Recommended Layout
Traffic Flow Requirements
Key Recommendations
Key Takeaways
- Map out every zone - ceremony, reception, dance floor, and service areas - before buying anything.
- Use a simple floor‑plan sketch or digital tool to test traffic flow and seating.
- Pick a layout style that matches your guest count and venue shape.
- Create a seating chart early, but stay flexible for last‑minute changes.
- Check sightlines, lighting, and accessibility to avoid common layout mishaps.
When you start planning, Wedding layout is the overall arrangement of spaces, tables, and traffic flow inside a wedding venue that shapes guest experience from ceremony to reception. This blueprint decides whether guests feel cozy or cramped, whether the bridal party can move smoothly, and how the photographer captures moments.
What Exactly Is a Wedding Layout?
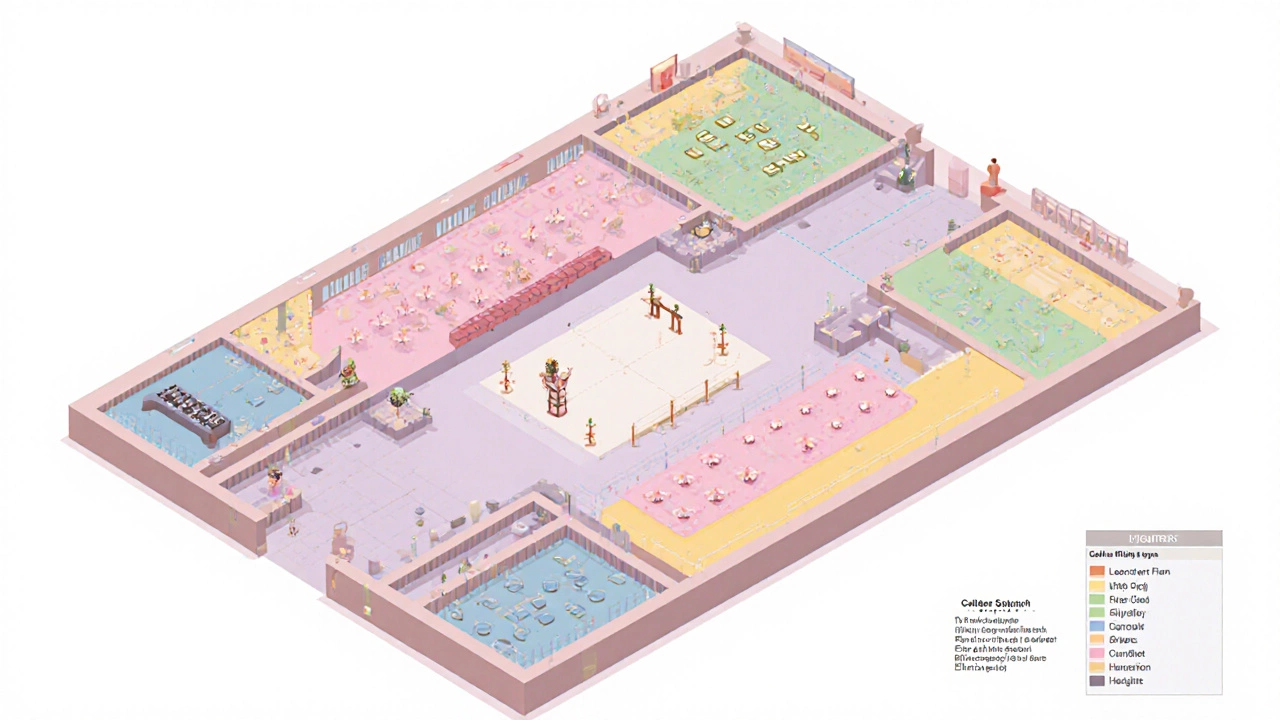
A wedding layout is more than a sketch on a napkin; it’s a strategic map that defines:
- The location of the ceremony space.
- The flow from ceremony to cocktail to dinner.
- Where tables, chairs, dance floor, and service stations sit.
- How lighting and décor enhance each zone.
Think of it as the floor plan you’d see in a museum - every exhibit (or activity) has a place, and visitors move in a logical path.
Step 1: Gather Core Data About Your Venue
Before you draw anything, collect these details:
- Exact dimensions (length, width, ceiling height).
- Location of doors, windows, and permanent fixtures.
- Power outlets and lighting rig points.
- Load‑bearing limits for heavy décor or dance floor setups.
- Accessibility routes for guests with mobility needs.
Ask your venue manager for a floor plan a scaled drawing that shows walls, columns, and utility points. If they only have a PDF, print it to scale and tape it to a wall for easy measuring.
Step 2: Define Functional Zones
Break the space into clear zones. Typical zones include:
- Ceremony space the area where vows are exchanged, often a podium or altar.
- Reception area where guests sit for dinner, includes tables and buffet or plated stations.
- Dance floor a cleared section for dancing, usually centered for visibility.
- Catering station the spot where servers set up plates, drinks, and desserts.
- Lighting design fixtures and uplights that create ambience and highlight key areas.
- Guest flow the natural pathways guests follow from entrance to exit.
Sketch each zone on graph paper (1 inch = 1 foot) or use a free tool like Floorplanner or AllSeated. Mark doors, windows, and any obstacles.
Step 3: Choose a Layout Style That Fits Your Guest Count
Different layouts suit different numbers and venue shapes. Below is a quick comparison.
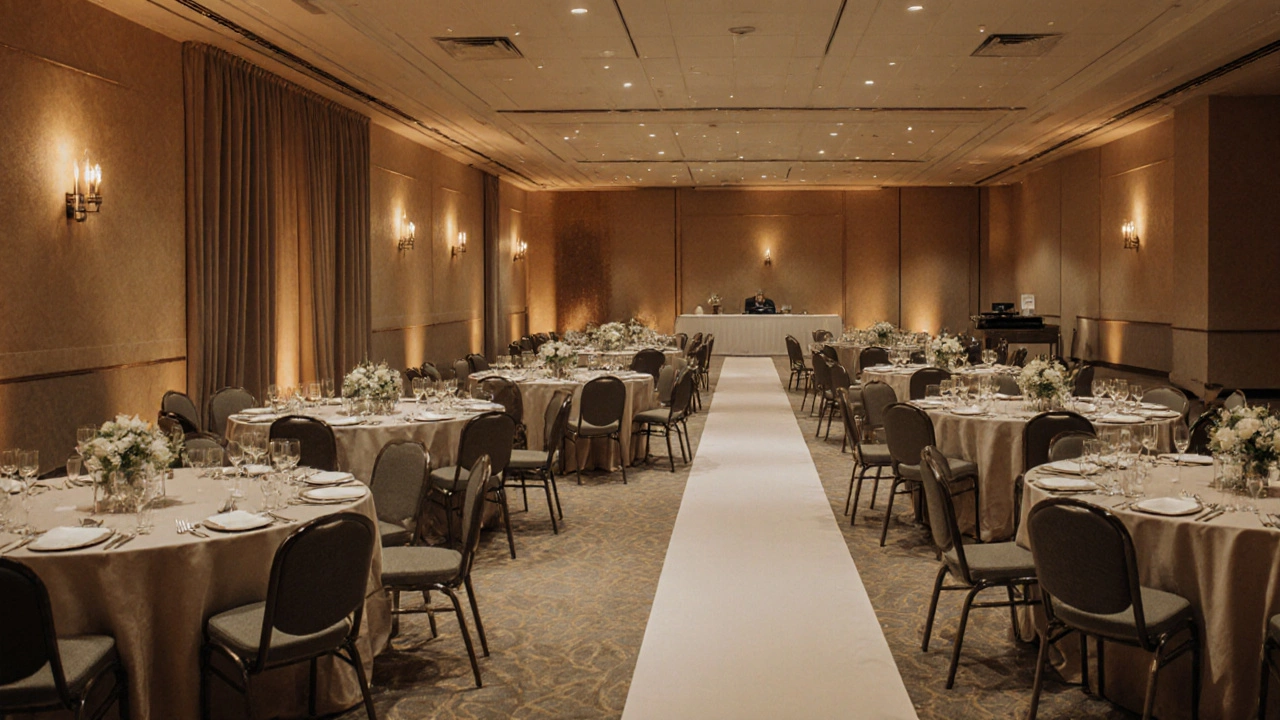
| Layout | Typical Capacity | Best For | Key Pros | Key Cons |
|---|---|---|---|---|
| Banquet (Rows) | 50‑200 | Formal, large venues | Maximizes seating, clear sightlines | Can feel rigid, limited dancing space |
| Round Tables | 30‑150 | Medium‑size weddings, social mixing | Encourages conversation, flexible | Requires more floor area |
| U‑Shape | 20‑80 | Intimate, speeches‑focused | All guests face the couple, good for audio | Leaves open space unused |
| Cocktail | 20‑100 | Modern, standing reception | Free flow, great for dancing | Less seating, may need extra chairs |
Match the style to your venue’s shape. A rectangular hall works well with banquet rows, while a round ballroom shines with a central dance floor and surrounding tables.
Step 4: Build a Seating Chart
A seating chart a visual map that assigns each guest to a specific table and seat turns a chaotic room into an ordered experience. Follow these steps:
- List all confirmed guests and group them by relationship (family, work, friends).
- Identify any special needs (wheelchair access, kids’ tables).
- Choose table shapes based on your layout style.
- Place key people (parents, bridal party) near the head table or central area.
- Use a digital tool (AllSeated, WeddingWire Seating) to drag‑and‑drop names.
- Print a large version and place it near the venue entrance for guests to find.
Keep a spreadsheet backup in case the software glitches on the big day.
Step 5: Test Traffic Flow and Sightlines
Walk the draft plan with a friend or two. Ask these questions:
- Can guests reach the restroom without cutting through the dance floor?
- Does the bride’s entrance line up with the ceremony backdrop?
- Is the DJ’s console visible from most tables?
- Are there any bottlenecks near the buffet?
If you spot a bottleneck, shift tables or widen aisles by at least 3‑4feet. Remember, a smooth guest flow the path guests take through the venue, from entrance to exit reduces stress for everyone.
Step 6: Add Lighting and Decorative Details
Lighting can hide or highlight any layout flaw. Use these tactics:
- Uplights along walls to draw eyes toward the dance floor.
- Soft fairy‑light strings above tables for intimate feel.
- Spotlights on the ceremony arch to focus attention.
Coordinate colors with your theme, but keep the brightness level low enough for romantic photos yet bright enough for safe movement.
Step 7: Create a Quick‑Reference Layout Sheet
Print a one‑page cheat sheet that includes:
- Venue name and date.
- Scale diagram with labeled zones.
- Key contact numbers (planner, DJ, caterer).
- Emergency exit locations.
Place this sheet on the venue manager’s desk and hand a copy to the day‑of coordinator. It’ll be the go‑to reference when a last‑minute guest changes seat.
Common Pitfalls & How to Avoid Them
- Overcrowding the dance floor. Keep at least 4‑5feet of clearance around the edges.
- Ignoring sightlines. Ensure all guests can see the couple during vows; raise heads or remove obstructing décor.
- Forgetting wheelchair access. Reserve a table with adjacent aisle width of 4feet.
- Placing the catering station too close to the dance floor. It creates traffic jams; locate it near the kitchen or service entrance.
Digital Tools That Make Layout Design Easy
While pen‑and‑paper works, these apps speed up revisions:
- AllSeated - drag‑and‑drop tables, auto‑generate seating charts, and share live links with guests.
- Floorplanner - create 2‑D and 3‑D renderings; great for visualizing lighting.
- Social Tables - best for larger weddings with multiple rooms.
All offer free trials; pick one that matches your comfort level.
Final Checklist Before the Big Day
- Confirm all dimensions with the venue.
- Verify that the lighting plan matches power outlet locations.
- Print and hang the seating chart at the entrance.
- Walk the venue with the day‑of coordinator to rehearse guest flow.
- Secure a copy of the layout sheet for the venue staff.
When everything lines up, the day feels effortless - and that’s the magic of a well‑designed wedding layout.
Frequently Asked Questions
How far in advance should I finalize my wedding layout?
Aim to lock down the layout at least six weeks before the wedding. That gives you time to tweak seating, confirm lighting, and share the plan with vendors.
Can I change the layout on the day of the wedding?
Minor tweaks, like moving a few chairs, are fine. Major changes (e.g., swapping banquet rows for round tables) usually require venue approval and can affect fire‑code compliance.
What layout works best for a small outdoor garden wedding?
A U‑shape or concentric circles work well. They keep the couple front‑and‑center while allowing guests to mingle and enjoy the scenery.
How do I ensure wheelchair‑accessible seating?
Reserve a table along an aisle that’s at least 4feet wide. Place the table at a height no higher than standard dining chairs, and keep the path clear of décor.
Should the dance floor be centered or off‑center?
Centering maximizes visibility and balances the room’s visual weight. Off‑center works if you have a focal point (like a stage) that you want to highlight instead.